
Building 3D Worlds With AI

I recently watched a video by Gary from DesignCourse.com about an AI project that turns your prompts into 3D virtual worlds. The project, called Skybox by Blockade Labs, generates a downloadable image of what you input for free and without any signup form required. 🤯
I was curious about how Gary and Blockade Labs rendered their worlds in a browser. As it turns out, the process is actually quite simple. Let's dive in!
Scaffolding the Project
Assuming basic web development knowledge, let's set up a super simple website.
First, create an index.html file that pulls in a stylesheet we'll create, and then installs a couple dependencies. We'll be using three.js to render our world, and we'll need its addons to control looking around it.
<!DOCTYPE html>

<html lang="en">
  <head>
    <meta charset="utf-8">
    <meta name="viewport" content="width=device-width, initial-scale=1.0">

    <title>Panoramic 3D World</title>

    <link rel="stylesheet" href="index.css" />
  </head>

  <body>
    <script async src="https://unpkg.com/es-module-shims@1.6.3/dist/es-module-shims.js"></script>

    <script type="importmap">
      {
        "imports": {
          "three": "https://unpkg.com/three@0.151.3/build/three.module.js",
          "three/addons/": "https://unpkg.com/three@0.151.3/examples/jsm/"
        }
      }
    </script>

    <script type="module" src="index.js"></script>
  </body>
</html>
The linked index.css file is really basic - just a couple of resets to the default browser styling. Everything that gets rendered will be controlled by our Javascript.
*, ::before, ::after {
  box-sizing: border-box;
}

* {
  margin: 0;
  padding: 0;
}
Understanding the Rendering Library
In the code above, we imported two modules from a popular JavaScript library called three.js. This library enables developers to create and display 3D graphics in web browsers using WebGL. WebGL is built into the web browser you are currently using to read this article, and it allows for high-performance and interactive 3D and 2D graphics.
However, for those of us who don't understand the math behind textures, scenes, cameras, and other related items, WebGL can be quite challenging. Fortunately, three.js makes it easier for the average developer to use these graphics libraries and create browser-based video games and 3D animations. I am thankful for the smart people who build these libraries!
Generating a World
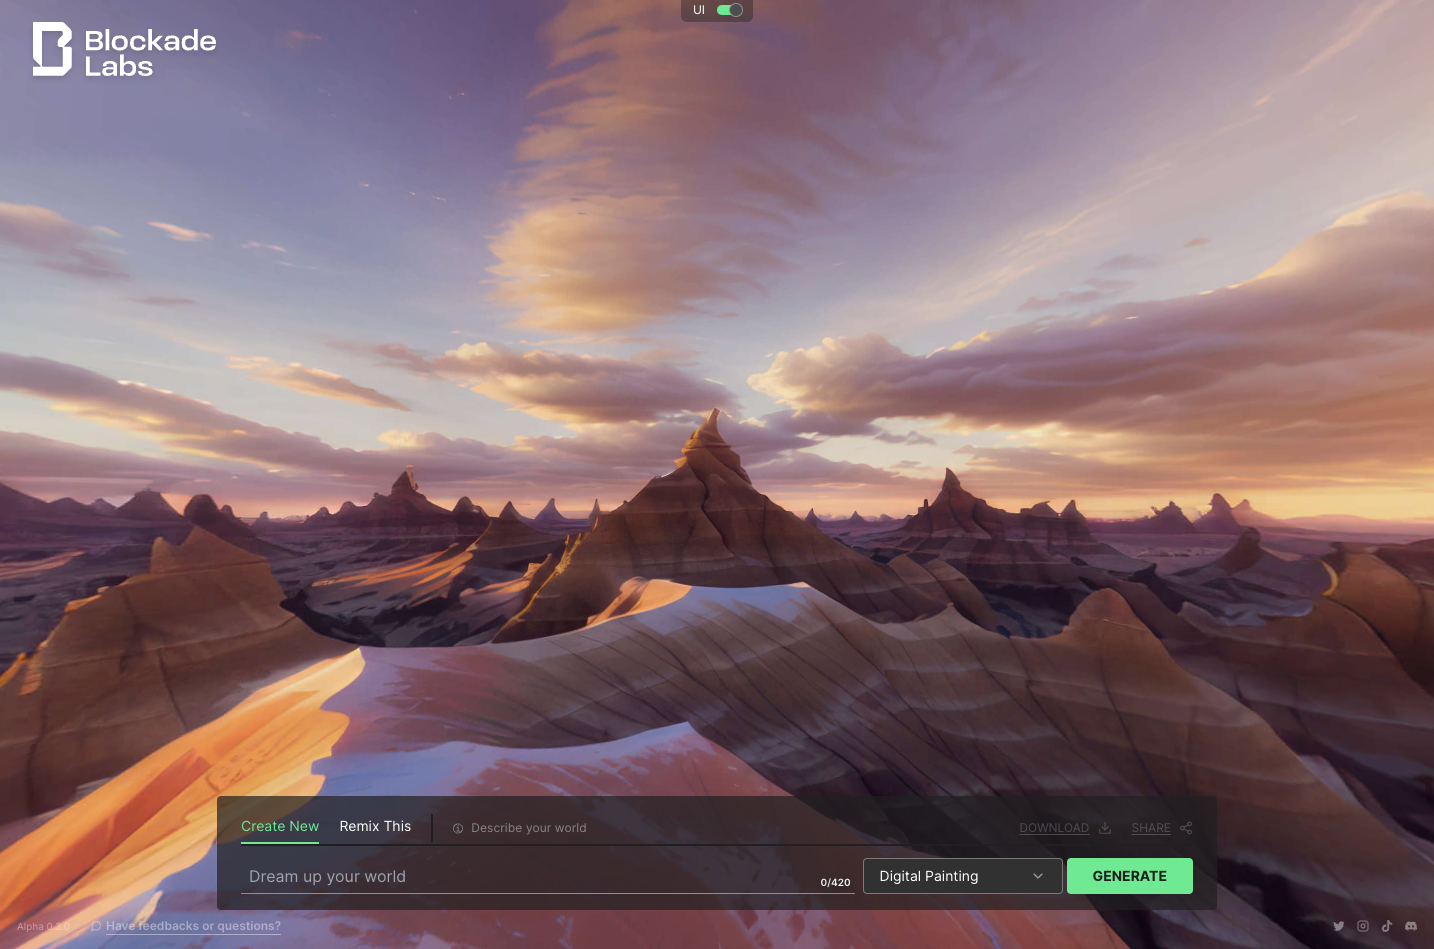
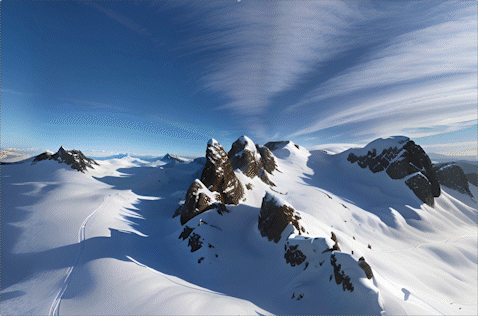
To render a world, we must first generate one. This can be done by visiting the Skybox website and entering any prompt, such as "a skier on a scenic mountain". Once the AI generates your world, you can download it as a picture.
When you open the image, you'll see a perfect panorama of your scene. You could print the image out and form it into a cylinder by putting the two edges of the paper together. Doing so will show that the content remains totally unbroken.
Rendering Time
To render the generated world, start by creating an index.js file in the root of your project. This file will handle everything.
Begin by importing the necessary dependencies:
import * as THREE from 'three';
import { OrbitControls } from 'three/addons/controls/OrbitControls.js';
Next, set up a scene, camera, and renderer. The scene will hold the 3D objects we create. The camera represents the user's point of view. The renderer will paint the scene from the user's perspective to the browser window.
const scene = new THREE.Scene();
const camera = new THREE.PerspectiveCamera(75, window.innerWidth / window.innerHeight, 0.1, 1000);
const renderer = new THREE.WebGLRenderer();
renderer.setSize(window.innerWidth, window.innerHeight);
To paint the scene to the document, the renderer needs a DOM element. Since there is nothing else on the page, we can use the body tag.
document.body.appendChild(renderer.domElement);
The image needs to be turned into a texture. Textures define surface properties, such as texture or color. We'll apply the created texture to a 3D object in a few more steps.
const loader = new THREE.TextureLoader();
const texture = loader.load('texture.jpg');
const material = new THREE.MeshBasicMaterial({ map: texture });
Then, we need to create a geometry that represents a sphere. We'll invert that geometry so that when a texture is applied, it's visible from the inside.
const geometry = new THREE.SphereGeometry(500, 60, 40);
geometry.scale(-1, 1, 1);
Once we have defined the texture and geometry, we can create a sphere from them and add it to the previously created scene:
const sphere = new THREE.Mesh(geometry, material);
scene.add(sphere);
At this point, we have our world defined, but we need to create a perspective from which we can view it. This can be achieved by placing the camera at the center of the sphere:
camera.position.set(0, 0, 0.1);
However, we don't want to always be looking at the same part of the world. We need to be able to change our perspective and look around. OrbitControls make this easy.
const controls = new OrbitControls(camera, renderer.domElement);
controls.enableZoom = true;
controls.enablePan = false;
controls.rotateSpeed = 0.3;
Finally, we will create an animation loop that rotates the image over time and continuously paints the scene to the screen.
let lastTime = 0;
const rotationSpeed = 0.00005;

function animate(time) {
  const delta = time - lastTime;
  lastTime = time;
  requestAnimationFrame(animate);

  sphere.rotation.y += rotationSpeed * delta;

  controls.update();
  renderer.render(scene, camera);
}

animate(0);
The last piece of code we will write is an event listener that updates the camera and renderer when the browser window is resized. This fixes a lot of perspective bugs that would come up without it.
function onWindowResize() {
  camera.aspect = window.innerWidth / window.innerHeight;
  camera.updateProjectionMatrix();
  renderer.setSize(window.innerWidth, window.innerHeight);
}

window.addEventListener('resize', onWindowResize, false);
Running the Project
Congratulations! You have written all the code for this project. You now have an index.css, index.html, index.js, and a texture.jpg that will render your 3D world. If you want, you could reduce the size of your image file to help with page load times.
One noteworthy item: because I used JavaScript modules and import maps, you cannot simply open the index.html file in a browser. Instead, you have to serve the files from a web server. The easiest way to do so is to run npx serve if you have Node installed.
With the server running, you can explore your world locally by going to the site. You can view my project on GitHub pages.
Conclusion
I'm glad I came across Gary's video on Skybox. It's exciting to see new features on websites, especially in the AI space, and learn how they work.
It's interesting to consider how I could use what I learned on new websites I create. This could be an inexpensive and straightforward way to replace background videos on site hero sections.
I hope you learned something too! I'd love to hear your thoughts on how you could apply this to the sites you build.